
How to Lazy Load React Components
Discover how to use React Lazy, React Suspense, and the Intersection Observer API to load content only when needed.
As frontend developers, one of the many aspects of our jobs is to build user interfaces. Sometimes the pages we build have an assortment of large imagery, videos, and so much other information, all competing for a user's clicks, it can make our pages slow. It can also be costly for the end user to download all of this code if they may never see or interact with it.
In today's age of component-based UIs, we're used to the process of looking at pages as a series of components, creating those components, and building the page using them. However, there's an important part of this process we often don't consider: can pieces of our UI be loaded later in order to offset some of the initial code a user needs to download?
In this article, we'll discover how to use React Lazy, React Suspense, and the Intersection Observer API.
CSS is not the focus of this post, so we won't be covering it. Please reference the demo code to see the complete styles.
Overall Goal
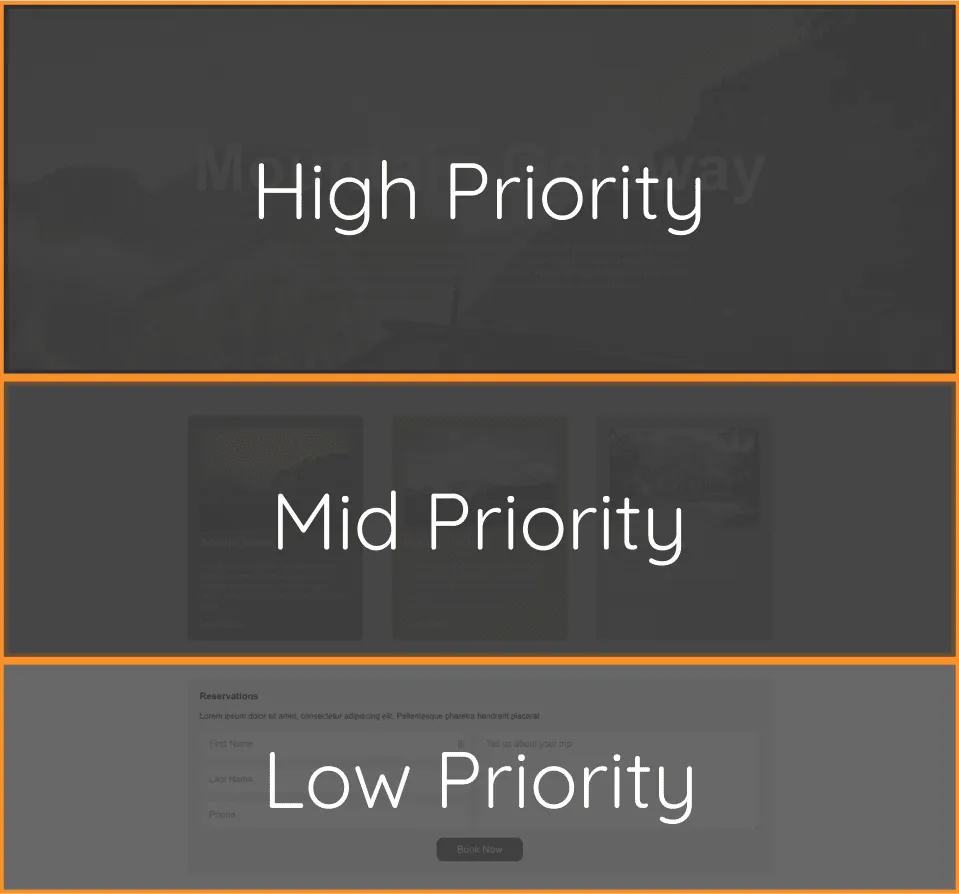
Let's assume we've been tasked with creating a landing page that has a hero image, some informational cards, and a contact form.

The goal is to reduce our code size by breaking this page up into sections based on priority, and to lazy load components with a lower priority only when a user scrolls to them. If the user never does, then we saved them a bit of bandwidth!
To help determine priority, we should consider a few things:
- Is this component going to be visible initially? As in, does this component exist "above the fold"? The answer here should generally be no.
- How large is this component? Larger components are some of the best candidates for lazy loading, as you will see the biggest performance gains from doing so.
- Does it contain complex business logic, animations, or anything else that is not beneficial unless a user can see or interact with it? The answer here should be yes.
- Is this content critical for SEO? The answer here should be no.
Let's apply this list to the components that make up our example page.
We know we have a hero with a background image, title, and short description. This hero is built to take up the entire viewport width, so it'll be all a user initially sees. Since this is front and center for the user, this is the "highest" priority of our three components, and we shouldn't defer this at all.
Next we have a section with a few informational cards. This section is not visible initially. Let's assume that these cards link off to pages that go into more detail so they don't impact SEO much. This is a good candidate to lazy load, as it is not the highest priority.
Finally, we have a contact form. This component is a great candidate for lazy loading because it passes all of our questions above and is the lowest priority.
Now that we've determined the priority, we can start putting together a solution.
Using React Lazy
As a first step, let's take a look at React Lazy.
React.lazy() lets you define a component that is loaded dynamically. This helps reduce the bundle size to delay loading components that aren’t used during the initial render. - React Docs
This is exactly what we want to do! It lets us split a component out of a larger bundle into its own file. Let's start building out the components.
Create a new file named LandingPage.jsx.
import React, {
  lazy,
  Suspense,
  useRef,
} from 'react';
import './styles.css';
import background from './assets/background.jpg';

const LandingPage = () => (
  <div className="outer">
    <section className="intro" style={{ backgroundImage: `url(${background})` }}>
      <div className="container">
        <h1>Mountain Getaway</h1>
        <div className="copy">
          <p>Lorem ipsum dolor sit amet, consectetur adipiscing elit. Pellentesque pharetra hendrerit placerat. Phasellus scelerisque in odio vitae suscipit. Nullam consectetur dapibus libero, non consectetur velit aliquam at. Nam vestibulum hendrerit eros at tempor. Phasellus eget magna rutrum orci tristique malesuada et in erat. Duis vitae facilisis metus, at hendrerit nunc.</p>
        </div>
      </div>
    </section>
    <section className="cards">
			Card Section Here!
    </section>
    <section className="contact">
      Contact Form Here!
    </section>
  </div>
);

export default LandingPage;
We will revisit this component soon.
Next, let's add a CardSection.jsx component. This will display some informational data.
import React from 'react';
import cardone from './assets/cardone.jpg';
import cardtwo from './assets/cardtwo.jpg';
import cardthree from './assets/cardthree.jpg';

const cardData = [
  {
    image: cardone,
    imageAlt: 'mountain sunset',
    title: 'Scenic Views',
    copy: 'In sed malesuada felis, eu feugiat sem. Curabitur lorem lorem, cursus a eros in, eleifend tincidunt orci. Fusce magna lacus, suscipit in ante sed, lobortis fringilla tortor.',
    ctaLink: '/views'
  },
  {
    image: cardtwo,
    imageAlt: 'green mountains',
    title: 'Hiking Trails',
    copy: 'Duis laoreet, augue id pharetra sodales, ante velit egestas turpis, eu dignissim ipsum purus sed enim. Donec auctor placerat pretium. Fusce molestie imperdiet elit id scelerisque',
    ctaLink: '/hiking'
  },
  {
    image: cardthree,
    imageAlt: 'mountain lake',
    title: 'Affordable Price',
    copy: 'Praesent mattis pharetra enim, nec feugiat erat tempus sit amet.',
    ctaLink: '/pricing'
  }
]

const CardSection = () => (
  <div className="container">
    {cardData.map((card, index) => (
      <div key={card.ctaLink} className={`card card-${index + 1}`}>
        <div className="top">
          <img src={card.image} alt={card.imageAlt} />
          <h3>{card.title}</h3>
          <p>{card.copy}</p>
        </div>
        <a href={card.ctaLink}>Learn More</a>
      </div>
    ))}
  </div>
);

export default CardSection;
Now let's add a contact form component, ContactForm.jsx.
import React from 'react';

const ContactForm = () => (
  <div className="container">
    <form id="contact" className="contact-card">
      <div className="disclaimer">
        <h3>Reservations</h3>
        <p>Lorem ipsum dolor sit amet, consectetur adipiscing elit. Pellentesque pharetra hendrerit placerat. </p>
      </div>
      <ul>
        <li>
          <input type="text" placeholder="First Name" name="first" />
        </li>
        <li>
          <input type="text" placeholder="Last Name" name="last" />
        </li>
        <li>
          <input type="tel" placeholder="Phone" name="phone" />
        </li>
        <li className="comment">
          <textarea id="info" placeholder="Tell us about your trip" />
        </li>
      </ul>
      <button type="submit">Book Now</button>
    </form>
  </div>
);

export default ContactForm;
Now that we have our components created, let's use CardSection and ContactForm in LandingPage.
import React, {
  lazy,
  Suspense,
  useRef,
} from 'react';
import './styles.css';
import background from './assets/background.jpg';

const CardSection = lazy(() => import(/* webpackChunkName: "CardSection" */ './CardSection'));
const ContactForm = lazy(() => import(/* webpackChunkName: "ContactForm" */ './ContactForm'));

const LandingPage = () => (
  <div className="outer">
    <section className="intro" style={{ backgroundImage: `url(${background})` }}>
      <div className="container">
        <h1>Mountain Getaway</h1>
        <div className="copy">
          <p>Lorem ipsum dolor sit amet, consectetur adipiscing elit. Pellentesque pharetra hendrerit placerat. Phasellus scelerisque in odio vitae suscipit. Nullam consectetur dapibus libero, non consectetur velit aliquam at. Nam vestibulum hendrerit eros at tempor. Phasellus eget magna rutrum orci tristique malesuada et in erat. Duis vitae facilisis metus, at hendrerit nunc.</p>
        </div>
      </div>
    </section>
    <section className="cards">
			<CardSection />
    </section>
    <section className="contact">
      <ContactForm />
    </section>
  </div>
);
If you aren't familiar with React.lazy(), the first thing you'll notice is that the import syntax is a bit different. We're using what are referred to as "dynamic imports".
React.lazy takes a function that must call a dynamic import(). This must return a Promise which resolves to a module with a default export containing a React component. - React Docs
The webpackChunkName part is optional, but we should use it to name the file, or "chunk", that is created from this import. Otherwise, you end up with a name like 12.chunk.js.
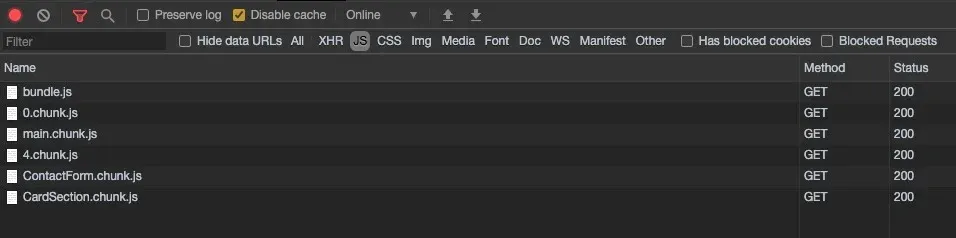
Using the Chrome DevTools and inspecting the Network Tab, we should see the CardSection and ContactForm components loading independently from our main bundle. This is a good start!
Adding React Suspense
Now that we have these files loading independently, we should consider adding a loading state in case the user's network connection is slow. In this demo, the components we work with are small. But if we had more complex logic, the files would be larger, and there could be a noticeable delay when downloading.
This is where React Suspense becomes helpful.
React.Suspense lets you specify the loading indicator in case some components in the tree below it are not yet ready to render. - React Docs
To add a loading state, all we need to do is wrap the components we want to lazy load with <Suspense> and provide a fallback prop. The contents of this fallback prop will be shown until the child component is rendered. In this demo, we'll simply display some text that says "loading", but on a production site, you'd probably want to reach for something like skeleton loading placeholders, or a spinner.
The return statement of our LandingPage component should now look like this:
return (
  <div className="outer">
    <section className="intro" style={{ backgroundImage: `url(${background})` }}>
      <div className="container">
        <h1>Mountain Getaway</h1>
        <div className="copy">
          <p>Lorem ipsum dolor sit amet, consectetur adipiscing elit. Pellentesque pharetra hendrerit placerat. Phasellus scelerisque in odio vitae suscipit. Nullam consectetur dapibus libero, non consectetur velit aliquam at. Nam vestibulum hendrerit eros at tempor. Phasellus eget magna rutrum orci tristique malesuada et in erat. Duis vitae facilisis metus, at hendrerit nunc.</p>
        </div>
      </div>
    </section>
    <section className="cards" ref={cardsSection}>
      <Suspense fallback={<div className="loading">Loading...</div>}>
        <CardSection />
      </Suspense>
    </section>
    <section className="contact" ref={contactSection}>
      <Suspense fallback={<div className="loading">Loading...</div>}>
        <ContactForm />
      </Suspense>
    </section>
  </div>
);
Writing An Intersection Observer React Hook
The next step is to defer loading the code for the CardSection and ContactForm components until the user is "viewing" them. To accomplish this, we'll use the Intersection Observer API and write a custom React hook so that we can reuse this functionality.
If you're unfamiliar with Intersection Observer, I have written about it before. There is a lot more you can do with it that we won't cover here, but the MDN docs and my Medium post are both good places to get up to speed.
Let's start by creating a new file named useIntersectionObserver.
import { useEffect, useState } from 'react';

const useIntersectionObserver = (reference) => {
	...
}

export default useIntersectionObserver;
Our custom hook will take a single parameter, reference (a React ref), to give the observer access to the underlying DOM element we want to watch.
This hook will maintain some state, isVisible, and this boolean value is what we want to return.
const useIntersectionObserver = (reference) => {
  const [isVisible, setIsVisible] = useState(false);

  return isVisible;
}
Let's add a useEffect hook to handle setting up the logic on mount.
const useIntersectionObserver = (reference) => {
  const [isVisible, setIsVisible] = useState(false);

  useEffect(() => {
    const handleIntersect = (entries, observer) => {
      if (entries[0].isIntersecting) {
        setIsVisible(true);
        observer.unobserve(entries[0].target);
        observer.disconnect();
      }
    }
  }, [reference]);

  return isVisible;
};
Inside useEffect, we add a callback function to do something in response to an item becoming visible. We'll name this function handleIntersect. Within this callback, we get access to entries, which is an array of items being observed, along with the observer itself.
We'll want to check if the entry (our element) is in view, or isIntersecting. If it is, we want to update the state to true, un-observe that entry, and disconnect the observer.
The hook we're writing is basic: it only watches for a single DOM element, reports when its visible, and stops observing. It can be expanded upon if you wanted to add logic that can track an array of different elements. For the purposes of this demo, we are keeping it simple.
Now we want to create a new IntersectionObserver and pass it the handleIntersect function we just wrote.
const useIntersectionObserver = (reference) => {
  const [isVisible, setIsVisible] = useState(false);

  useEffect(() => {
    const handleIntersect = (entries, observer) => {
      if (entries[0].isIntersecting) {
        setIsVisible(true);
        observer.unobserve(entries[0].target);
        observer.disconnect();
      }
    }

		// Create the observer, passing in the callback
    const observer = new IntersectionObserver(handleIntersect);

		// If we have a ref value, start observing it
    if (reference) {
      observer.observe(reference.current);
    }

    // If unmounting, disconnect the observer
    return () => observer.disconnect();
  }, [reference]);

  return isVisible;
};
If we have a reference, then begin observing the underlying DOM node, reference.current.
We need a check to ensure we have a reference before trying to observe it. Otherwise, an error will occur.
Finally, return a function in our useEffect that will disconnect the observer if the component unmounts.
Implementing the Intersection Observer Hook
Our custom hook is done. Let's go back to the LandingPage component and use it.
At this point we also want to create two refs using the useRef hook, so that the useIntersectionObserver hook has access to our DOM elements.
...
import useIntersectionObserver from './useIntersectionObserver';

const LandingPage = () => {
	const cardsSection = useRef(null);
  const contactSection = useRef(null);
  const isCardSectionVisible = useIntersectionObserver(cardsSection);
  const isContactSectionVisible = useIntersectionObserver(contactSection);

	return (
    <div className="outer">
      ...
      <section className="cards" ref={cardsSection}>
        {isCardSectionVisible && (
          <Suspense fallback={<div className="loading">Loading...</div>}>
            <CardSection />
          </Suspense>
        )}
      </section>
      <section className="contact" ref={contactSection}>
        {isContactSectionVisible && (
          <Suspense fallback={<div className="loading">Loading...</div>}>
            <ContactForm />
          </Suspense>
        )}
      </section>
    </div>
  );
}
With the isCardSectionVisible and isContactSectionVisible constants in place, we are now conditionally rendering our two components only when they've become visible!
Caveats
There is one minor caveat with this lazy loading pattern. If a user loads the initial page, and their internet connection drops, they can't download any additional files until they have a connection again, unless their browser has already previously cached them. In fact, if this happens, they will likely encounter an error.
While this is an edge case, and something we can't prevent, it should be caught. One way to guard against it is to use the componentDidCatch lifecycle method, within an ErrorBoundary component. This way you can control the output a user sees if they do encounter this scenario.
Summary
Hopefully the pattern this article describes has given you some new ways to think about optimizing your pages with lazy loaded components. By determining a priority for components, we can defer loading them to improve the performance of our website or app, while our users consume less bandwidth.