
What Is an Abstract Syntax Tree?
How to use AST as a frontend developer.
If you’ve used ESLint, at times it can feel like magic. Maybe you’ve wondered "How does it know?" as you fix another red underline in your code. ESLint, Babel, Prettier, Webpack and countless other tools rely on something called an "AST".
In this article, you’ll learn about AST and some ways you can use it to your advantage.
What is an AST?
You can think of an AST (Abstract Syntax Tree) as a representation of your code structure as a tree. Each node or branch of the tree corresponds to a part of that code.
Let’s take a simple JavaScript console log as an example - console.log('hi!'). This boils down to the following AST.
{
  "type": "Program",
  "body": [
    {
      "type": "ExpressionStatement",
      "expression": {
        "type": "CallExpression",
        "callee": {
          "type": "MemberExpression",
          "computed": false,
          "object": {
            "type": "Identifier",
            "name": "console"
          },
          "property": {
            "type": "Identifier",
            "name": "log"
          }
        },
        "arguments": [
          {
            "type": "Literal",
            "value": "hi!"
          }
        ]
      }
    }
  ]
}
It may look ton of information for such a small piece of code (and parts of the output have actually been left out) but at a glance you can actually kind of see what’s happening. It becomes even clearer with a visual.
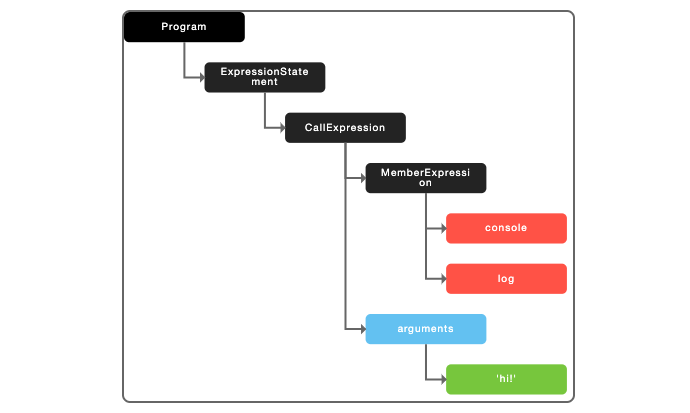
console.log('hi!')AST is just another way to describe your code without using the actual language syntax. Only the structure and content is relevant and that’s the point.
How does it work?
The best way to learn how AST works is using a tool like AST Explorer or JavaScript AST Visualizer and looking at how the output relates to your original code.
Changing the options at the top like the parser, settings, and transform will impact what the output of the tree looks like. The examples below just use the defaults.
Let’s try a few examples.
First open up AST Explorer and add this line of JavaScript.
const getItemNames = (items) => items.map((item) => item.name);
If you click around the various parts of the code in “tree view”, you’ll see:
VariableDeclarator- This refers to the constant we declared, and by clicking intoIdentifieryou’ll see thegetItemNamesconstant and the exact start and end lines.ArrowFunctionExpression- This is the function itself. Clicking intoparams, you can see theIdentifierisitemswhich matches our function param.CallExpression,ArrowFunctionExpression- Digging deeper into the function, you can see that everything defined in the code is in some way reflected in the AST.
Now let’s try some CSS. Be sure to change the tool to parse CSS at the top.
.container {
  background: '#ccc';
  margin: 0 auto;
  max-width: 1200px;
  width: 100%;
}
This one is a bit more self explanatory. selectorText contains the selector and CSSStyleDeclaration contains all of the style rules that were defined.
Experiment by adding more detailed CSS like media queries or CSS variables and see what the output looks like.
Where is it used?
As frontend developers, we spend a lot of our time writing HTML, CSS and Javascript. An AST is like looking at this code under a microscope with a different perspective, giving you tons of information about what’s happening, what lines it’s happening on and much more.
The real power of AST is to help you and your team solve specific problems that other more generic tools can’t.
For example, let’s say your team wants to track component usage across your codebase. No problem, AST can help!
Or maybe you’re looking to write a custom ESLint rule based on very specific business logic. No off-the-shelf rule will work, but you can write this yourself using AST.
Maybe you need a codemod to help your team with the daunting task of updating a dependency that has breaking changes. AST is commonly used in codemods.
Now that we’ve discussed some uses, let’s walk through a more detailed example.
A Custom ESLint Rule
Let’s see how AST can be used to write a custom ESLint rule.

This example only shows how AST pertains to ESLint. Much of the real setup of an ESLint rule is beyond the scope of this article because it varies based on the version of ESLint you're using, and your specific project environment. Please check out Custom ESLint Rules For Faster Refactoring for an example of the entire process of setting up a custom rule, or refer to the ESLint docs.
Let’s pretend that the name of your product has recently changed. The old name was "GenericAIProduct" and now it’s "AskJimBot" (these names are entirely fictional).
The change was recent enough that your team is still trying to avoid using the old name. Let’s fix that!
We’ll use AST to write a custom ESLint rule to warn about using the old product name. Our example won’t be perfect and there are surely some edge cases not considered. But it should give you the basic idea.
We’ll check a few lines of sample code for function names, variables and code comments containing the string "genericaiproduct". If we find it, then surface a warning via ESLint, something like "Please use AskJimBot when referring to our product".
First open up the AST Explorer tool and choose ESLint V8 at the top. Also make sure JavaScript is selected as the language.

You should now see four panels. Here’s what they do.
- Top left - The sample code to run the AST/ESLint checks against
- Top right - The AST output from the sample code
- Bottom left - Where we'll be writing the ESLint rule
- Bottom right - Real time output of the rule
Paste the sample code below into the top left box.
// This function is from the earliest iteration of GenericAIProduct
function genericAIProductMath() {
  return 1 + 1;
}

const genericAIProductConstant = "test value";
You should already start to see some AST being output. Click through the "Tree" or "JSON" views to get a better idea of the relationship between the sample and the AST.
Clicking on the sample code in the top left box highlights the corresponding AST on the right, which is really helpful.
If you look closely at the AST, you should see a comments array, and inspecting it further you’ll see more information about the comment we added - its start, end, type and most importantly, value.
We can use this value to check for the "genericaiproduct" string.
Now let’s start with an empty ESLint rule. Paste this into the bottom left box.
module.exports = {
  meta: {
    type: "suggestion",
    docs: {
      description: "Use new product name",
    },
    fixable: "code",
    schema: [], // no options
  },
  create: function (context) {
    const testValue = "genericaiproduct";
    const warningMessage = "Please use AskJimBot when referring to our product";

    // Our assertions go here
    return {};
  },
};
The outer part of the AST object is named Program, so to look for the comment we’ll need that. Just in case the comments array is actually empty, add an return early.
return {
  // First check the comments
  Program(node) {
    if (node.comments.length === 0) return;

    node.comments.map((comment) => { ... });
  },
};
If we do have code comments, map over them.
Check each comment (converted to lowercase) for the testValue string. If found, use the ESLint context.report() method to return an object with details about the problem.
Include the comment string itself, the loc object about where it’s located in the file, and the warning message to be shown.
node.comments.map((comment) => {
  if (comment.value.toLowerCase().includes(testValue)) {
    return context.report({
      node: comment,
      loc: comment.loc,
      message: warningMessage
    });
  }
});
And that’s it! If things are working correctly, you'll see the warning message appear in the bottom right box.
Next, the check for variables will use VariableDeclaration, which is pretty similar.
If there are variables declared in the file, map over them and if the variable name includes the string we’re looking for, return the same type of ESLint warning.
module.exports = {
  ...
  create: function (context) {
    ...

    return {
      // First check the comments
      Program(node) { ... },

      // Then check variables/constants
      VariableDeclaration(node) {
        node.declarations.map(dec => {
          if (dec.id.name.toLowerCase().includes(testValue)) {
            return context.report({
              node: node,
              loc: dec.loc,
              message: warningMessage,
            });
          }
        });
      },
    };
  },
};
Last but not least, we have FunctionDeclaration.
module.exports = {
  ...
  create: function (context) {
    ...

    return {
      // First check the comments
      Program(node) { ... },

      // Then check variables/constants
      VariableDeclaration(node) { ... },

      // Then check function declarations
      FunctionDeclaration(node) {
        if (node.id.name.toLowerCase().includes(testValue)) {
          return context.report(node, node.loc, warningMessage);
        }
      },
    };
  },
};
Now you have a complete ESLint rule that can be added into your codebase. This same rule could also be expanded to include CSS and HTML files.
Summary
In this article, we covered an overview of what Abstract Syntax Trees are, different ways you can use them and a detailed example of how you'd use AST to write a custom ESLint rule.
But only just scratched the surface of what's possible.