
Highlighting Text on Scroll
Highlight text while scrolling through a container.
In this article, we’ll be building another scroll-linked animation effect using React and Framer Motion. This time, highlighting a paragraph of text as we scroll through the containing element.
It’s a simple but visually interesting effect, and as you’ll see, building it is fairly straightforward!
The inspiration for this comes from an older version of the lucidmotors.com homepage.

If you missed the first article in this series where we build a Scroll-Linked Content Reveal Animation, please check it out!
One thing this article does not go into detail about is when words wrap as the screen is resized. Handling that is beyond the scope of this article, but you’d likely need to implement event listeners on the page to recalculate the logic we write, or CSS breakpoints to show a different instance of the component depending on the screen size. Both of these involve more code and will vary depending on your use case.
Getting Started
Since we’ll be building a React component to handle this functionality, the first thing to do is determine the props to pass.
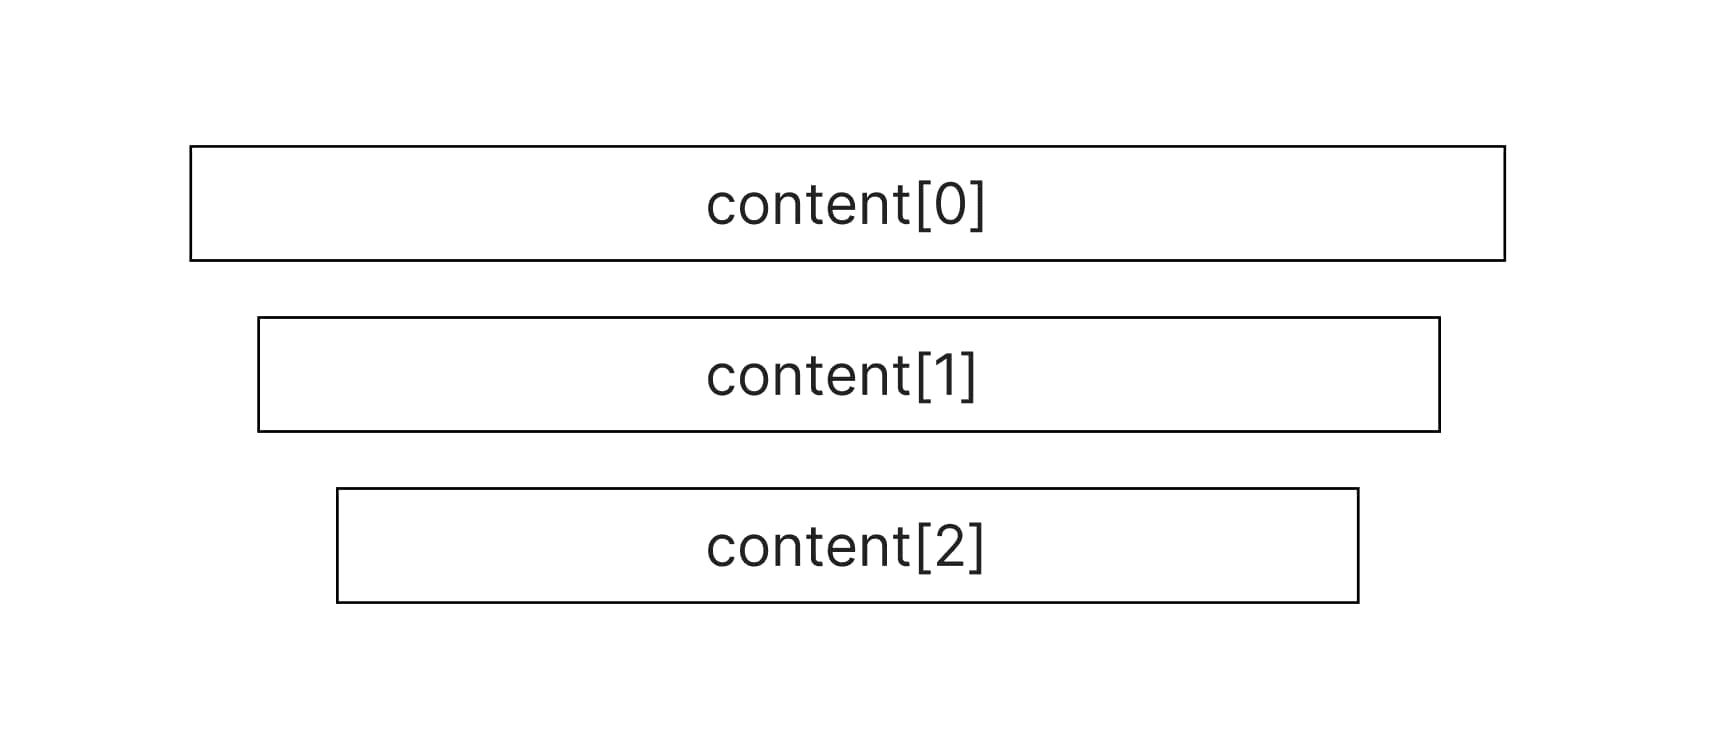
Our component will take a single prop named content, which is an array of strings.
const content = [
  'Lorem ipsum dolor sit amet, consectetur adipiscing elit,',
  'sed do eiusmod tempor incididunt ut labore et',
  'dolore magna aliqua. Ut enim ad minim veniam',
];
The content is broken up like this to give us a simple, predictable way to output the copy as individual lines. We’ll discuss why in a minute.
If this approach feels rigid to you, it would be possible to write some logic to parse the
contentprop and split it into an array automatically. But to simplify this article, we are passing manually separated text strings.
Next, make a new file named ScrollText.js. The component name should match the file name.
export const ScrollText = ({ content }) => { ... }
Finally, make sure you have framer-motion installed and import it in the component. This article was written using version 10.9.1.
To start with, import motion and useScroll.
import { motion, useScroll } from 'framer-motion';
How it Works
This effect works by storing a DOM reference (using a React ref) for each line of text and determining its scroll position relative to the viewport using the Framer Motion useScroll hook.
We’ll use that scroll position, along with the CSS clip-path property to reveal a duplicate copy of text positioned above the bottom text.
Markup
Now that we’ve determined how the component will work, let’s build it!
First, the component should output two divs: an outer that can contain a color or background image, and an inner to keep the text contained to a specific width.
export const ScrollText = ({ content }) => {
	return (
		<div className="outer">
      <div className="inner">
	      ...
      </div>
    </div>
	);
}
In the inner div, we map over each sentence passed in via the content prop.
<div className="inner">
	<p>
	  {content.map((item) => (
	    <ContentLine
	      key={item}
	      content={item}
	    />
	  ))}
	</p>
</div>
You could substitute using a unique ID or some other value as the key. We’ll use the text itself for this example, but that may not work in all scenarios.
At this point we will create a second component named ContentLine. For the purposes of this article, you can add it to the same file along with ScrollText.
The ContentLine component helps compartmentalize the functionality of each line of text, since they all track their own scroll progress.
ContentLine renders the content passed to it in three span elements. The outermost text-container span will help with positioning and overflow.
We’ll need to reference this element, so use the useRef hook.
import { useRef } from 'react';

const ContentLine = ({ content }) => {
  const contentRef = useRef();

  return (
    <span className="text-container" ref={contentRef}>
      ...
    </span>
  );
}
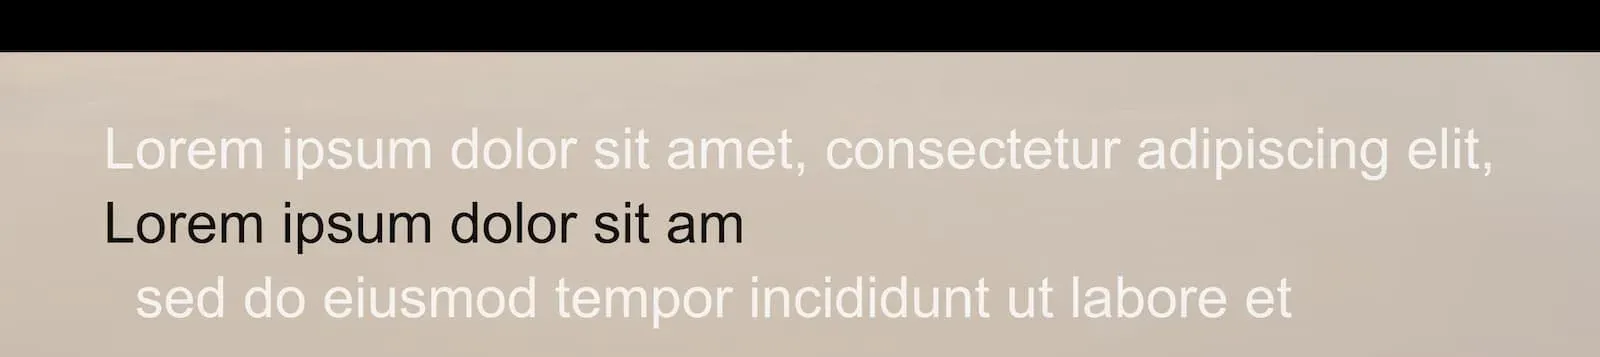
Within text-container, we have the highlighted-text span, which is the text that’s highlighted when scrolling.
We’ll pass a data-text attribute here containing the content. In the next section, this attribute is referenced to output a “cloned” copy of this text.
return (
  <span className="text-container" ref={contentRef}>
    <motion.span
      className="highlighted-text"
      data-text={content}
    />
  </span>
);
You may notice this is the first time we’re using the motion component. We need this because we will be passing the element an animation value derived by Framer Motion and motion needs to be used in order for it to be animated properly.
You can learn more about the
motioncomponent here, or refer to the previous article in this series for a more in depth explanation.
Last, we have the static-text that appears underneath the highlighted text.
return (
  <span className="text-container" ref={contentRef}>
    <motion.span
      className="highlighted-text"
      data-text={content}
    />
    <span className="static-text">
      {content}
    </span>
  </span>
);
CSS
With the markup in place, let’s add some CSS.
Some of this will vary depending on your use case, so we’ll only focus on the important styles. Please reference the demo for the full CSS.
First, we have the outer div. This can be styled however you want, but in the demo we’re using a background image with a CSS grayscale filter.
.outer {
  background: url('./main.jpg');
  background-size: cover;
  background-position: center;
  filter: grayscale(50%);
}
Then some basic styles for the inner paragraph text and the text-container.
.inner p {
  display: inline;
  line-height: 1.3;
}

.text-container {
  position: relative;
  overflow: hidden;
  display: block;
}
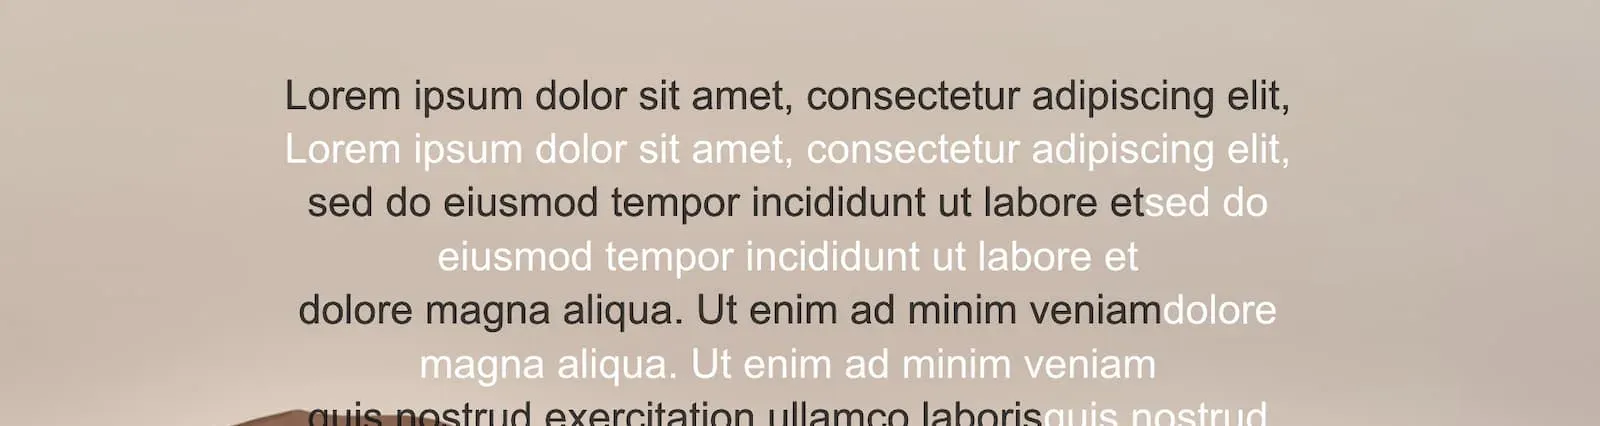
Let's discuss how to duplicate the text.
In the previous section, we used a data-text attribute on the static-text span. This gives us access via the CSS content property to output each line of text as a before pseudo element.
.highlighted-text:before {
  content: attr(data-text);
  display: inline-block;
  opacity: 0.8;
}
This is a good use case for a psuedo element because it prevents us from having duplicate content on the page for the sole purpose of the highlight effect.
The last bit of CSS is for the highlighted-text.
.highlighted-text {
  color: #111;
  width: 100%;
  height: 100%;
  position: absolute;
  left: 0;
  z-index: 0;
  transition: clip-path 0.1s ease;
  text-shadow: 0 0 0 #111;
}
This positions the highlighted-text directly over the top of the static-text. It also sets a transition on the clip-path property (the property we’ll be animating) to give it a very slight visual delay. Adjust this value yourself to see what works for you.
Add the
position: absolute;property last to see the text move into place.
Framer Motion Hooks
With the markup and styles done, let’s work with Framer Motion!
As mentioned above, the component will use three React hooks that Framer Motion provides: useScroll, useTransform and useMotionTemplate.
First, to get the scroll progress of each line of text inside the viewport, we add useScroll.
The target param should be a reference to text-container and the offset describes where the element and the viewport meet.
const ContentLine = ({ content }) => {
  const contentRef = useRef();

  const { scrollYProgress } = useScroll({
    target: contentRef,
    offset: ["end center", "start start"]
  });
  ...
}
Offsets are a bit tricky to explain. Please refer to the Framer Motion docs for more detail, but it’s usually best to just experiment with values and see what works for you.
The above gives us the scroll progress as scrollYProgress, but it’s not quite what we need. Since we want to set the clip-path of the text from 100% to 0%, we need to transform this value.
Framer Motion includes a hook named useTransform to transform one set of values into another.
It’ll take in the scrollYProgress value, and two arrays.
The first array you can think of as sort of a threshold. It controls the time from when one row of text finishes highlighting until the next line starts. After some experimentation, [0, 0.15] seemed to work relatively well, but this number is somewhat arbitrary and requires a bit of trial and error.
The second array is straightforward and describes the start and end percentages: starting at 100% and ending at 0%.
const ContentLine = ({ content }) => {
  const contentRef = useRef(null);

  const { scrollYProgress } = useScroll({
    target: contentRef,
    offset: ["end center", "start start"]
  });

	const scrollValue = useTransform(scrollYProgress, [0, 0.15], ['100%', '0%']);

	...
}
We’re almost there! All we need now is to take the scrollValue and apply it to the highlighted-text span.
Framer Motion has yet another hook that can help us out here: useMotionTemplate.
const clipPathVal = useMotionTemplate`inset(0% ${scrollValue} 0% 0%)`;
If we pass it the scrollValue calculated above, it’ll output a motion value that contains both dynamic and static (unchanging) values. For example, inset(0% 100% 0% 0%), inset(0% 20% 0% 0%), etc.
Finally, once we have the clipPathVal created, we pass it as a style property to the highlighted-text span.
const ContentLine = ({ content }) => {
	...
  const clipPathVal = useMotionTemplate`inset(0% ${scrollValue} 0% 0%)`;

	return (
    <span className="text-container" ref={contentRef}>
      <motion.span
        style={{ clipPath: clipPathVal }}
        className="highlighted-text"
        data-text={content}
      />
      ...
    </span>
  );
}
Why do we need to use a hook instead of a template string for the style object? Why can't we just do something like this?
style={{ clipPath: `inset(0% ${scrollValue} 0% 0%)` }}
motion components need to be passed a special type of “motion value” for animations to work, and using a template string for the style property directly won’t work. It needs to be run through something that returns a motion value and useMotionTemplate does that.
You can read more about motion values in the Framer Motion docs.
Conclusion
This article provided a step-by-step guide to building a scroll-linked animation in React using Framer Motion and explains how to use the useScroll, useTransform, and useMotionTemplate hooks.
Framer Motion is the tool of choice in this series, though the same effect could have been achieved in many other ways.